
The “cut-and-fold” motion isn’t a gentle stir; it’s a precise kinetic technique designed to manage thermal energy and pressure, preventing the molecular breakdown of rice grains.
- The vertical “cutting” motion cleaves through rice clumps without applying horizontal shear force, which preserves each grain’s integrity.
- Simultaneous fanning rapidly evaporates surface moisture, creating a glossy, protective starch sheath rather than simply cooling the rice.
Recommendation: To stop making rice paste, focus on the physics of your hand movements and the thermal properties of your tools, not just the ingredients.
Every aspiring cook faces the same tragic moment: a pot of perfectly cooked Japanese rice, fluffy and distinct, is transformed into a dense, starchy paste the second the seasoned vinegar is introduced. The common advice is to use a “cutting and folding motion,” but this instruction is deceptively simple. It treats the process as a mere recipe step, ignoring the critical physics at play. The result is often a clumsy stirring that crushes the delicate grains, smearing starch and guaranteeing a mushy, disappointing texture. This failure isn’t due to a bad recipe; it’s a failure to understand kinetics.
The truth is that creating perfect sushi rice, or shari, is an exercise in applied physics. It’s about thermal management, pressure dynamics, and controlling the very state of the starch on each grain’s surface. The ‘cut-and-fold’ is not a suggestion; it is a highly specific technique designed to navigate the crucial temperature window where the rice is receptive to seasoning. Moving too slow, using the wrong tool, or applying pressure from the wrong angle will irrevocably ruin the final product. Understanding the *why* behind the motion is the only way to master it.
This guide deconstructs the physics of the process. We will analyze the kinetic principles of each movement, from the angle of the paddle to the velocity of the fanning. By shifting your focus from “what to do” to “why it works,” you will learn to control the forces at play and finally achieve the glossy, individual grains that define world-class sushi rice.
To master this culinary technique, we will explore the precise mechanics and scientific principles at work. This article breaks down each component of the process, transforming abstract advice into concrete, actionable knowledge.
Summary: The Kinetic Principles of Perfect Sushi Rice
- Why Must You Fan the Rice While Mixing the Vinegar?
- Why Does Wood Absorb Excess Vinegar Better Than a Plastic Bowl?
- How Fast Must You Mix Before the Rice Cools Down Too Much?
- How to Break Apart Rice Clumps Using the Edge of the Paddle?
- The Taste Test: How to Ensure Vinegar Reaches the Bottom Grains?
- Rice Cooker or Donabe Pot: Which Vessel Keeps Shari at Body Temperature Longer?
- How to Calculate the Ideal Vinegar Ratio for 3 Cups of Uncooked Rice?
- Why Does Your Sushi Rice Look Dull Instead of Glossy?
Why Must You Fan the Rice While Mixing the Vinegar?
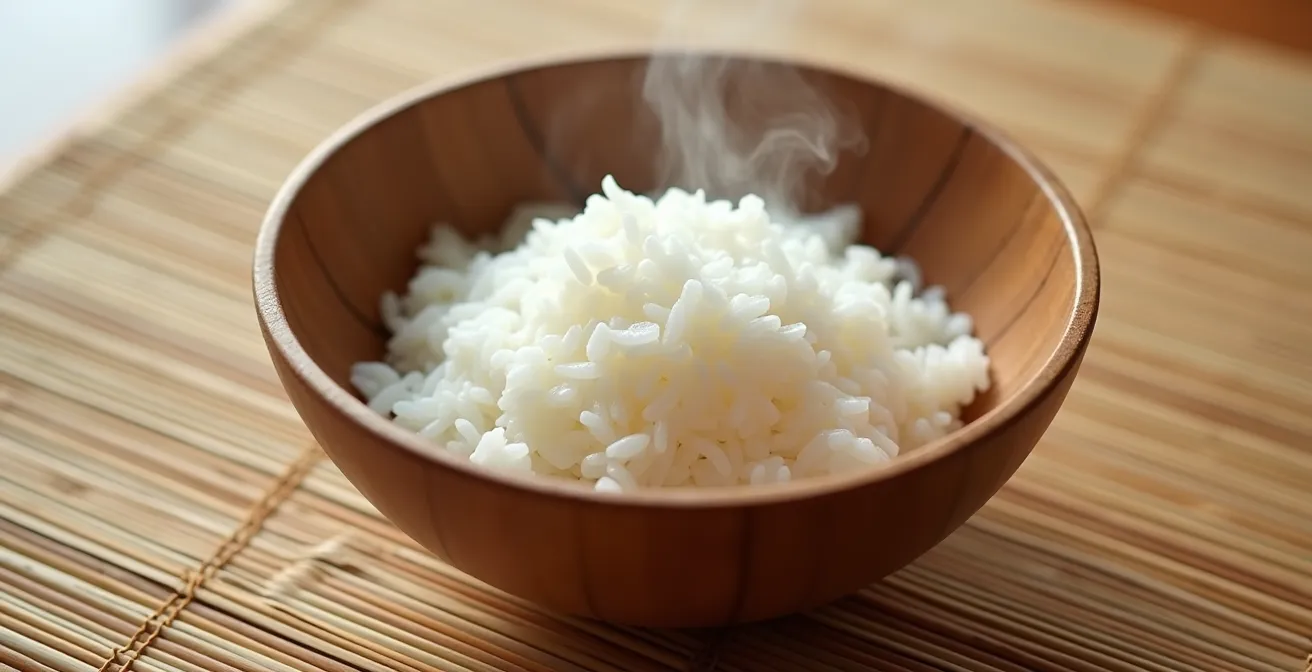
Fanning the rice is not primarily about cooling it down; it’s a critical step in moisture and thermal management. When hot rice is mixed with vinegar, two processes must occur simultaneously: the grains must absorb the seasoning, and the excess surface moisture from the vinegar and steam must be wicked away. Fanning accelerates evaporation, which performs a vital function: it rapidly sets the outer layer of starch on each grain into a glossy, transparent sheath. This is what creates the signature sheen of high-quality shari.
This process works because the rice is in a specific physical state. After cooking, the starches are gelatinized and swollen with water. Scientific research shows that rice starch gelatinization occurs between 57.9-64.4°C, a temperature window where the grains are pliable and absorbent. Vigorous fanning removes the surface water before it can make the rice soggy, locking in the absorbed vinegar and creating a firm, non-sticky surface. Without fanning, the steam and vinegar moisture would linger, resulting in a dull, wet, and clumpy texture as the rice cools too slowly.
The kinetic action is a two-handed operation. One hand executes the cutting and folding motion with the paddle, while the other maintains a constant, strong airflow with a fan (uchiwa). The goal is to create a rhythm where every grain is briefly exposed to the moving air as it’s turned over. This ensures uniform evaporation across the entire batch, preventing some parts from drying faster than others. The fanning stops once the intense steam subsides and the rice has cooled to near room temperature, a process that typically takes about 10 minutes.
Why Does Wood Absorb Excess Vinegar Better Than a Plastic Bowl?
The traditional wooden bowl, or hangiri, is superior to plastic or metal for one key reason that goes beyond simple absorption: thermal insulation. A plastic or metal bowl has very low thermal mass and acts as a heat sink, rapidly pulling warmth out of the rice. This sudden temperature drop is disastrous, as it causes the pores on the surface of the rice grains to close before they can fully absorb the seasoned vinegar. The result is unevenly seasoned rice with pools of unabsorbed vinegar at the bottom of the bowl.
A wooden hangiri, typically made of cypress, has natural insulating properties. It doesn’t steal heat from the rice. Instead, it helps maintain the rice at an optimal, elevated temperature for a longer period, allowing for maximum vinegar absorption. While the wood does absorb some excess moisture, its primary role is as a thermal buffer. According to research by HASEGAWA, a company specializing in advanced culinary tools, rice that cools too quickly in a metal bowl fails to absorb vinegar effectively, leading directly to a soggy outcome.
This is why the choice of vessel is a critical component of thermal management. The porous, unvarnished wood works in concert with the fanning action. The fan removes moisture from the rice’s surface via evaporation, while the wood absorbs any excess liquid that might pool at the bottom. This dual-action system ensures each grain is perfectly seasoned and has the ideal moisture content. Using a plastic bowl eliminates the insulation and absorption benefits, making it nearly impossible to achieve the same professional-grade texture and flavor distribution.
How Fast Must You Mix Before the Rice Cools Down Too Much?
The mixing process is a race against time, dictated by a critical temperature window. You must mix quickly and efficiently enough to evenly coat every grain with vinegar before the rice cools below the optimal absorption temperature. While the rice is hot (above 60°C), its starches are gelatinized and porous, ready to absorb the seasoning. As it cools, these pores begin to close. The goal is to complete the mixing and fanning process while the rice descends from its initial hot state to body temperature.
Professional sushi chefs aim to work with the rice while it is hot to the touch and complete the process as it settles to its final holding state. Many experts agree that the ideal texture is achieved when the seasoned rice, or shari, is held at a specific warmth. In fact, many professional sushi chefs maintain rice at precisely 37°C (body temperature) for service. This means the mixing and initial cooling phase is a controlled descent to this target, not a rush to get it cold.
The speed of your mixing should be brisk but deliberate, not frantic. A frantic motion leads to mashing. The proper kinetic control involves a steady rhythm of cutting, lifting, and turning, synchronized with the fanning hand. The process is generally completed within 10-15 minutes. You’re not just stirring; you’re aerating and separating. According to the culinary team at Just One Cookbook, the visual and tactile cues are your best guide:
The mixing is complete when the intense steam subsides, a uniform gloss appears on every grain, and the rice feels light and separates easily when scooped and dropped from the paddle.
– Just One Cookbook culinary team, Just One Cookbook – How to Make Sushi Rice Guide
If you move too slowly, the rice will cool before the vinegar is distributed, leading to clumps of unseasoned rice and a generally bland flavor. If you move too fast and carelessly, you’ll crush the grains. The key is finding the efficient, controlled pace that achieves full distribution within the optimal thermal window.
How to Break Apart Rice Clumps Using the Edge of the Paddle?
This is the absolute heart of the “cut-and-fold” motion and the key to avoiding mushy rice. Breaking apart clumps must be done with a vertical, cleaving force, not a horizontal, smearing one. This is a question of pressure dynamics. When you press down on rice with the flat of the paddle or stir it, you apply a broad, crushing pressure that mashes the grains. Using the thin edge of the rice paddle (shamoji) concentrates all the force along a single line, allowing it to slice through a clump cleanly.
To execute this with proper kinetic control, follow these physical principles:
- Angle of Attack: Hold the rice paddle at a near-vertical angle, roughly 80 to 90 degrees relative to the surface of the rice. This presents the thinnest possible profile to the grains.
- Vertical Pressure: Apply pressure directly downwards, as if you were using a knife. This “cleaving” motion separates the clump without dragging or smearing the delicate, starchy surface of the individual grains.
- Slicing Motion: Use a gentle side-to-side slicing motion with the edge as you press down. This helps the paddle work its way through the clump instead of relying on brute force.
- Lift and Separate: Immediately after slicing through a clump, use the paddle to gently scoop up the now-separated grains from underneath and fold them over to another part of the bowl. This aerates the rice and continues the mixing process.
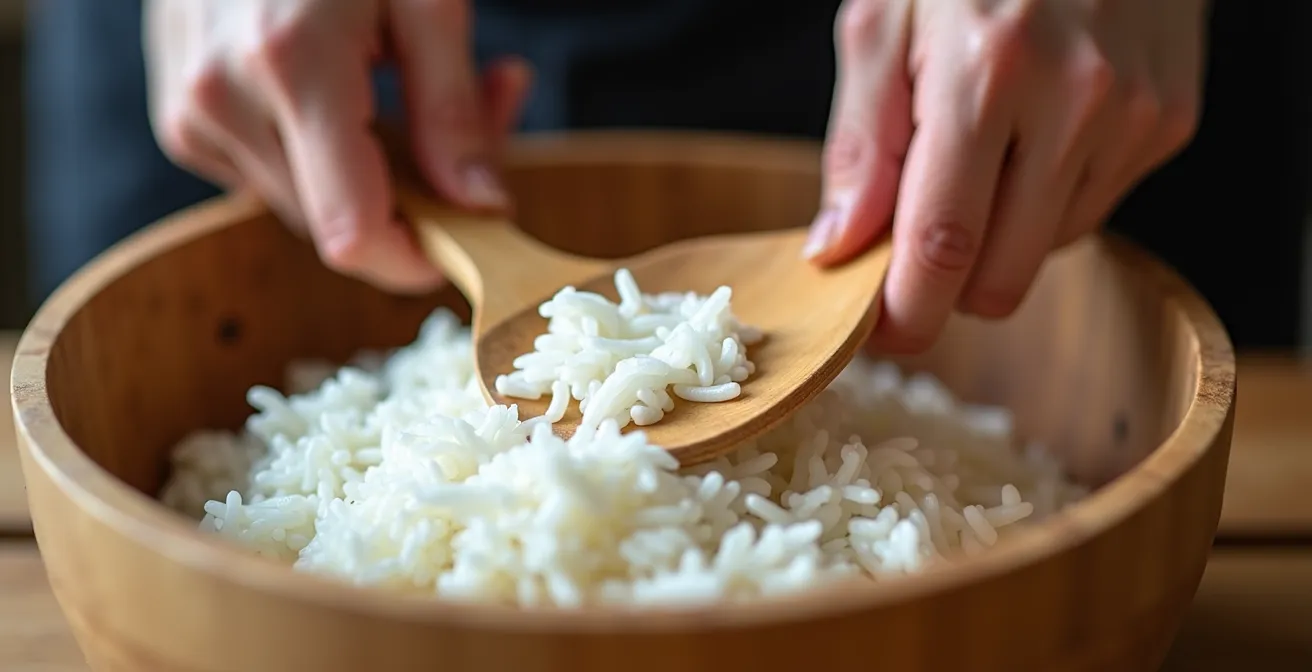
Think of it as performing micro-surgery on the rice. Your goal is to separate, not to blend. Each time you see a clump, you don’t stir it; you target it, slice it, and fold it. This precise, controlled movement ensures that the structural integrity of every single grain is maintained, which is essential for the final light, fluffy texture.
The Taste Test: How to Ensure Vinegar Reaches the Bottom Grains?
A visual inspection isn’t enough to confirm that the vinegar has been perfectly distributed. The top layer may look glossy and well-mixed, while the bottom remains dense and unseasoned. The professional method for quality control is a physical and sensory analysis known as the Three-Point Taste Protocol. This technique ensures that your kinetic mixing process has successfully achieved uniform seasoning from top to bottom.
The core of this protocol is the “Cross-Section Test.” It allows you to access and evaluate grains from every layer of the rice mound. Here is how you perform it:
- Step 1: Create a Cross-Section. After you believe the mixing is complete, use the edge of your rice paddle to cut a clean trench directly down the center of the mounded rice.
- Step 2: Expose the Layers. Gently push the two halves apart with the paddle. This reveals a clear cross-section view of the rice, from the top surface to the very bottom layer that was in contact with the bowl.
- Step 3: Conduct the Three-Point Taste. Using your fingers or the tip of the paddle, take a small sample from three distinct zones: the top surface grains, the grains in the middle of the exposed cross-section, and the grains from the absolute bottom layer.
- Step 4: Analyze for Consistency. Taste each of the three samples. They should all have an identical, balanced flavor profile—not too sharp, not too bland. The texture should also be consistent: separate, firm, and with a slight chew. If the bottom layer is mushy or tastes strongly of vinegar, or if the middle is bland, your mixing was not thorough enough.
If you detect inconsistencies, the final step is to perform a “Gather and Mound” technique. Use the paddle to sweep all the rice from the edges of the bowl back into a central pile and gently fold it a few more times. This helps redistribute any peripheral grains that were missed. This methodical testing process is the only way to be certain that every grain of rice is perfectly seasoned.
Rice Cooker or Donabe Pot: Which Vessel Keeps Shari at Body Temperature Longer?
Once your sushi rice is perfectly mixed, the challenge shifts to holding it at the ideal body temperature (around 37°C) for service. This is another critical phase of thermal management. The choice of holding vessel has a dramatic impact on the rice’s final texture. A modern electric rice cooker and a traditional clay donabe pot represent two opposing physical philosophies.
A rice cooker, particularly its “keep warm” function, is the enemy of perfect shari. As the Sushi Chef Association Guidelines warn, this feature is destructive. It applies active, dry heat from the bottom, which slowly steams and then bakes the seasoned rice. This process destroys the delicate texture and evaporates the subtle aroma of the vinegar, leaving you with dry, hardened grains. The thin metal insert of a rice cooker has low thermal mass, meaning it cannot hold a stable temperature on its own and relies on this damaging active heating element.
A rice cooker’s ‘keep warm’ setting is the enemy of perfect shari. This function applies active, dry heat, which will destroy the texture and delicate flavor of the seasoned rice within minutes.
– Sushi Chef Association Guidelines, Professional Sushi Preparation Standards
A donabe, or a wooden hangiri covered with a damp cloth, operates on the principle of passive insulation. The thick, porous clay walls of a donabe have a very high thermal mass. They absorb and radiate heat evenly, keeping the rice at a stable temperature for hours without any external heat source. It also breathes, allowing excess humidity to escape rather than trapping it like a sealed rice cooker. This passive thermal stability preserves the perfect texture and flavor you worked so hard to create.
This comparative table, based on an analysis of vessel thermal properties, highlights the fundamental differences.
| Feature | Rice Cooker | Donabe Clay Pot |
|---|---|---|
| Thermal Mass | Low (thin metal insert) | High (thick clay walls) |
| Heat Retention at 37°C | Poor – requires active heating | Excellent – passive insulation |
| Moisture Regulation | Traps 100% humidity | Breathes naturally through porous clay |
| Keep Warm Function Effect | Destroys texture with dry heat | Not applicable – passive retention only |
| Ideal Hold Time | Less than 30 minutes | 2-3 hours at body temperature |
How to Calculate the Ideal Vinegar Ratio for 3 Cups of Uncooked Rice?
While the physical mixing technique is paramount, the chemical component—the vinegar mixture, or sushi-zu—must also be correctly proportioned. However, there is no single “magic ratio.” The ideal amount of vinegar depends on the rice’s age, the season, the strength of your vinegar, and even the humidity in your kitchen. Professionals start with a baseline and calibrate from there. A common standard used by professional sushi chefs measure seasoning using a weight-based ratio of 180-200ml of sushi-zu per 1 kilogram of cooked rice.
For home cooks using volumetric measures, a reliable starting point for 3 cups of uncooked Japanese short-grain rice (which yields roughly 6-7 cups cooked) is a mixture made from:
- ½ cup (120 ml) Japanese rice vinegar
- 2 tablespoons (25 g) granulated sugar
- 2 teaspoons (12 g) fine sea salt
This provides a balanced, classic flavor profile. However, this is just your baseline for calibration. New-harvest rice (shinmai) is more moist and requires 10-15% less vinegar to avoid becoming too wet. Older rice is drier and may need slightly more. The only way to find your perfect ratio is to test and document it.
Action Plan: Calibrating Your Perfect Sushi-zu Ratio
- Establish a Baseline: For 3 cups of uncooked rice, start with the standard recipe: ½ cup rice vinegar, 2 tbsp sugar, and 2 tsp salt. Gently heat (do not boil) to dissolve the solids.
- Perform a Small Batch Test: Before seasoning your main batch, mix a small, measured amount of your sushi-zu with 100g of the cooked rice and taste it. This prevents ruining the entire batch.
- Account for Rice Seasonality: If you are using new-harvest rice (shinmai), which is noticeably softer and more moist, reduce the amount of vinegar in your baseline by 10-15%.
- Check Vinegar Acidity: Different brands of rice vinegar have varying acidity levels (typically 4-7%). A stronger vinegar may require more sugar to balance, or you may need to use less of it overall.
- Document Your Perfect Ratio: Once you find the combination that works perfectly for your specific brand of rice and vinegar, write it down! Note the exact measurements for future consistency.
Treating the ratio as a fixed rule is a common mistake. Approaching it as a scientific calibration process is the key to achieving consistently delicious results every time.
Key Takeaways
- The ‘cut-and-fold’ is a kinetic skill based on vertical pressure to prevent crushing rice grains, not a simple stirring motion.
- Fanning is essential for rapid evaporation to create a glossy starch sheath, which is more important than just cooling the rice.
- A wooden hangiri provides critical thermal insulation, keeping the rice in the optimal temperature zone for vinegar absorption, a function plastic or metal bowls cannot perform.
Why Does Your Sushi Rice Look Dull Instead of Glossy?
The coveted gloss on perfect sushi rice is not an additive; it’s a physical state achieved through the correct application of technique. A dull appearance is a direct symptom of procedural errors during the mixing process. The shine comes from a thin, smooth, transparent layer of set starch on the surface of each grain that reflects light. Dullness occurs when that layer is either smeared, contaminated, or fails to form correctly.
There are three primary physical causes for dull rice. First is improper pressure application. When you press, stir, or mash the rice, you are smearing a microscopic paste of broken-down starch across the grains. This rough, opaque layer diffuses light instead of reflecting it, resulting in a matte finish. This is the most common error, stemming from a misunderstanding of the “cut-and-fold” motion.
Second is insufficient washing. Before cooking, rice must be washed until the water runs completely clear. This removes the fine powder of excess starch from the surface of the grains. If this powder remains, it will create a cloudy, starchy film during cooking and mixing that guarantees a dull outcome, no matter how perfect your mixing technique is.
Finally, there’s the “Lost Cooling Race.” As highlighted by comparative studies, the gloss forms when the hot, gelatinized surface starch is cooled rapidly by fanning. This quick transition sets it into a smooth, glassy coat. If the cooling is too slow—due to inadequate fanning or a humid environment—the starch layer sets improperly into a rough, opaque state. This is why the synchronized, kinetic action of cutting, folding, and fanning is so crucial. The gloss is the visual proof that you have managed the thermal and physical forces correctly.
Frequently Asked Questions About Why the ‘Cut-and-Fold’ Mixing Motion Prevents Mushy Rice?
Why does pressing or mashing rice grains cause dullness?
When grains are pressed, a microscopic layer of starchy paste is smeared over their surface, creating a rough layer that diffuses light instead of reflecting it.
How many times should I wash rice before cooking to prevent dullness?
Wash the rice 3-4 times until the water runs completely clear, removing all excess starch powder from the grain surface.
What is the ‘Lost Cooling Race’ that causes dull rice?
If the cooling process is too slow during mixing, the outer starch layer fails to set properly into a glossy coat, resulting in a lackluster finish.