A perfectly sharp knife is useless if your technique involves sawing; you are not cutting, but microscopically cooking and tearing the fish.
- A back-and-forth sawing motion generates destructive frictional heat, denaturing delicate proteins and altering texture.
- This incorrect motion ruptures muscle cell walls (myocytes), causing them to leak moisture and flavor prematurely, resulting in a mushy, degraded taste.
Recommendation: Master the single, long-pull draw cut. It uses the knife’s weight and full length as a precision biomechanical tool to preserve cellular integrity and deliver the cleanest possible flavor.
For many home cooks, the experience is frustratingly familiar. You acquire a beautiful, sushi-grade block of tuna or salmon, your sharpest knife at the ready. Yet, despite your best efforts, the resulting slices are slightly ragged, the surface lacks a professional sheen, and the texture is somehow… mushy. The common advice is to simply “use a sharp knife,” but this is a dangerous oversimplification. The problem isn’t just the edge of your blade; it’s the fundamental physics of your movement.
A back-and-forth sawing motion, which feels intuitive with a Western chef’s knife, is the single most destructive action you can take against a piece of raw fish. This guide will ignore the platitudes and instead delve into the biomechanics of the cut. We will explore why slicing sashimi is less a culinary art and more a surgical procedure at a cellular level. The true key isn’t just sharpness; it’s the elimination of friction, the preservation of cellular integrity, and the understanding of how shear force, not tearing force, unlocks the fish’s ultimate potential for flavor and texture. This article will deconstruct the single pulling motion, analyze the microscopic damage from improper technique, and provide the principles needed to achieve a perfect slice, even with a standard knife.
To provide a clear visual of the ideal technique, the following video demonstrates the fluid, continuous motion that is central to a perfect sashimi slice. It complements the anatomical principles we will explore, showing the theory put into practice.
To fully grasp these advanced concepts, we will dissect the process into its core components. The following sections break down the physics, biology, and techniques required to elevate your sashimi preparation from a simple task to a precision craft.
Summary: Why Sawing Fish Is a Biomechanical Failure
- Why Must Sashimi Be Cut in One Continuous Pulling Motion?
- Microscope View: What Does Torn Fish Flesh Look Like vs. Sliced Flesh?
- How to Use the Entire Length of the Blade for Large Slices?
- 45 Degrees or 90 Degrees: How Does Cutting Angle Change Chewing Resistance?
- How Lightly Should You Hold the Knife to Feel the Fish Texture?
- Thick Slice or Paper Thin: Which Cut Best Suits White Fish Texture?
- How to Slice Fish for Maximum Flavor Release Using a Standard Chef Knife?
- How to Prevent Rust on Your Carbon-Steel Yanagiba in a Home Kitchen?
Why Must Sashimi Be Cut in One Continuous Pulling Motion?
The continuous pulling motion is not a stylistic choice; it is a fundamental principle of thermodynamics applied to a biological medium. The primary enemy of delicate fish protein is heat. A back-and-forth “sawing” motion maximizes the time the blade is in contact with the flesh and, more critically, generates significant frictional heat. While imperceptible to the touch, this micro-heating at the cellular level is devastating. Fish proteins are far more sensitive to temperature changes than those in red meat. In fact, research shows that myosin proteins in fish begin denaturing at just 39.59°C (103.26°F), a temperature easily reached at the point of friction from a sawing blade.
This heat-induced protein denaturation is, in essence, a form of microscopic cooking. It alters the protein structure, causing it to firm up and lose its natural, tender state. The result is a texture that is slightly “gummy” or “chewy” rather than meltingly soft. The single, continuous pull-cut minimizes this effect. It is a swift, efficient transfer of energy. By using the long blade of a sashimi knife (like a yanagiba), the cut is completed in one fluid movement, dramatically reducing the blade-to-flesh contact time and keeping frictional heat below the critical denaturation threshold. The goal is to pass the blade through the cells, not to agitate them into a heated state.
Microscope View: What Does Torn Fish Flesh Look Like vs. Sliced Flesh?
Imagine the flesh of a fish not as a solid mass, but as a tightly packed structure of delicate, water-filled balloons. These are the muscle cells, or myocytes. The goal of a perfect cut is to pass a blade between these cells, or to sever them with such precision that their walls remain largely intact. This preserves the moisture and flavor locked within. A sawing motion does the opposite; it is a tearing, rupturing force. Under a microscope, the difference is stark. A cleanly sliced piece of fish shows smooth-walled, intact myocytes, glistening and full. A “sawed” piece shows a battlefield: a mass of ruptured cells, their contents spilled out, with torn and mangled connective tissues.
This cellular rupture is the direct cause of a mushy texture and a dull, washed-out flavor. The released intracellular fluid, rich in enzymes and flavor compounds, pools on the surface of the cut, where it quickly oxidizes and degrades. This is why a poorly cut piece of sashimi can taste “fishy” and feel wet, while a perfectly cut piece has a clean, bright taste and a firm, almost “dry” surface feel. The friction from sawing exacerbates this damage. A 2022 study on yellowtail demonstrated how even minimal heat profoundly affects protein solubility, confirming that the combination of tearing and friction is a catastrophic event at the cellular level.
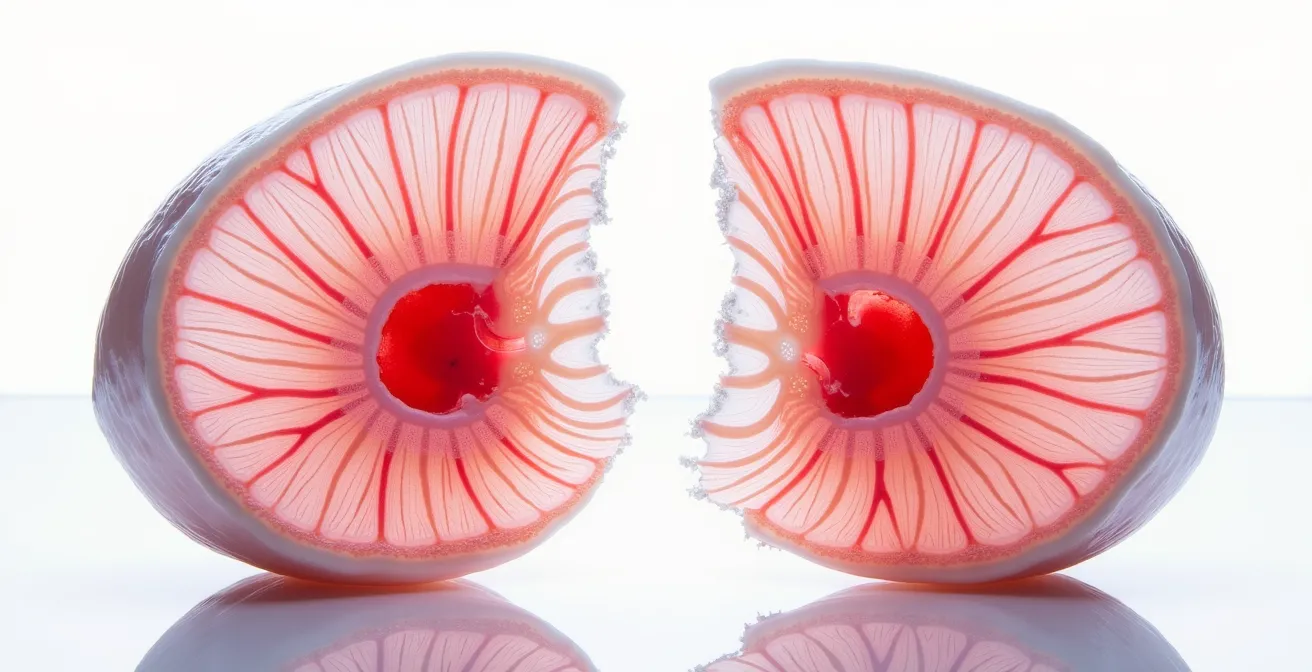
As you can see in the comparison, the structural integrity of the cleanly sliced fibers is preserved, allowing them to retain their natural texture and moisture. The torn fibers, however, represent a complete breakdown of the fish’s delicate architecture, leading to a compromised eating experience. This visual evidence underscores the absolute necessity of a clean, shearing cut over a destructive, tearing motion.
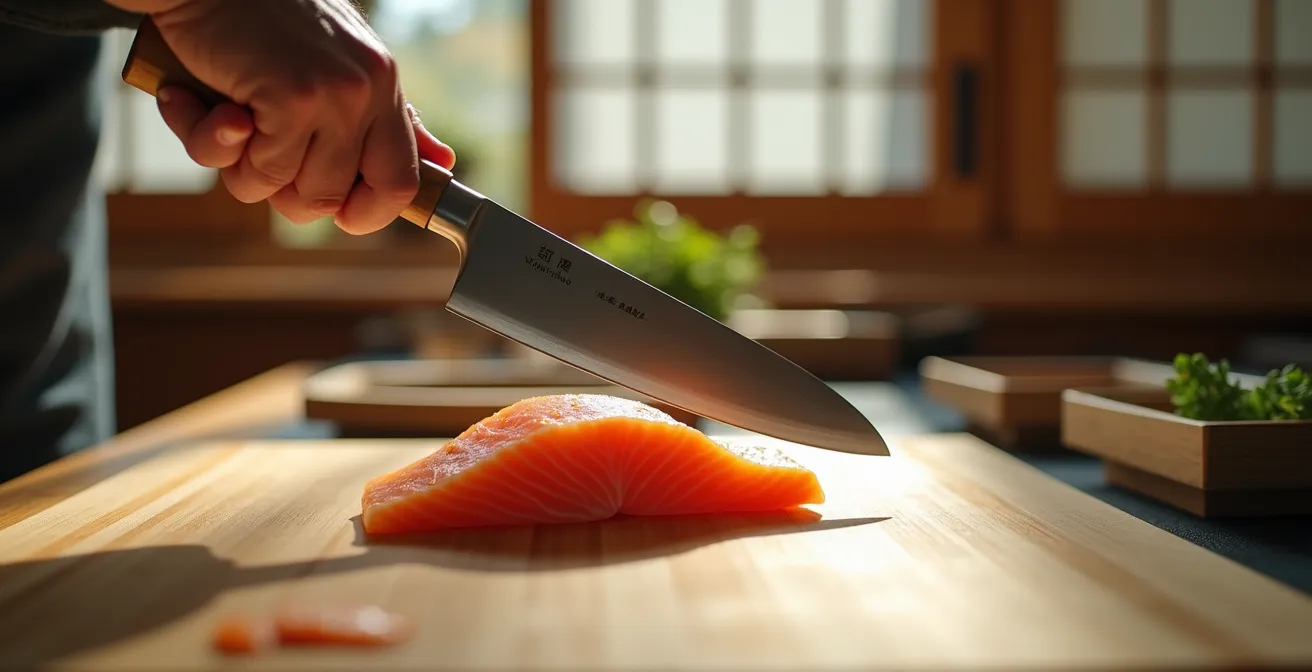
How to Use the Entire Length of the Blade for Large Slices?
Using the entire length of the blade is not about making the longest possible slice; it’s about the physics of pressure distribution. Force applied over a small area is intense; the same force spread over a large area is gentle. When you use only a small portion of your knife in a sawing motion, you are concentrating all the downward pressure onto a few centimeters of the blade. This requires more force from you, which in turn crushes the delicate myocytes before they are even cut. This is a compressive force, not a cutting one, and it is a primary cause of cell damage.
The correct technique, known as the “pull cut” or “draw cut,” transforms the knife from a blunt instrument into a precision slicing machine. You start the cut at the heel of the blade (the part closest to the handle) and draw the knife smoothly towards you, allowing the slice to finish at the very tip. In this single motion, the entire length of the blade does the work. The downward pressure is almost zero; you are letting the weight of the blade itself perform the cut. Because the cutting action is distributed across a 20-30 cm edge, the pressure at any single point is infinitesimally small. This is a shearing force, which parts the muscle fibers cleanly without crushing them.
This technique is the physical manifestation of “letting the knife do the work.” It requires a long, thin blade for optimal performance, which is why the Japanese yanagiba is the specialized tool for this job. The comparison between these two methods is not subtle; it is the difference between a controlled, low-impact procedure and a high-impact, destructive one.
| Aspect | Full Blade Length | Partial Blade Use |
|---|---|---|
| Pressure Distribution | Even across entire cut | Concentrated in small area |
| Cell Damage | Minimal | Significant bruising |
| Cut Quality | Clean, smooth surface | Rough, torn edges |
| Effort Required | Less force needed | More force required |
45 Degrees or 90 Degrees: How Does Cutting Angle Change Chewing Resistance?
The angle of the blade relative to the cutting board is another critical variable in controlling the final texture and flavor perception. A cut made at 90 degrees (perpendicular to the board), known as hira-zukuri, produces a slice with a smaller surface area and exposes the muscle fibers in cross-section. This is ideal for softer, fattier fish like tuna (chu-toro or o-toro), where the shorter fiber length and high fat content already ensure a tender bite. The thicker, block-like cut provides a satisfying chew and allows the fat to melt on the tongue.
However, for firmer, leaner white fish like snapper (tai) or flounder (hirame), a 90-degree cut can result in a piece that is tough and chewy. The muscle fibers are longer and stronger, and cutting them short doesn’t do enough to break them down. This is where angular cutting becomes a biomechanical necessity. By cutting at a 45-degree angle, a technique known as sogi-zukuri, you create a slice that is significantly wider and thinner, with a much larger surface area. This angular cut slices through the muscle fibers obliquely, effectively shortening them and making the flesh feel much more tender in the mouth.
Case Study: Sogi-zukuri Technique for Texture Optimization
Professional sushi chefs instinctively apply this principle. They use the sogigiri (shaving cut) method for firm white fish, cutting at a low 45-degree angle to produce very thin slices with broad cross-sections. This technique achieves two critical objectives: it mechanically reduces the chewing resistance of the firm flesh, making it more palatable. Secondly, it maximizes the surface area of the slice that comes into contact with the palate. This increased contact enhances the perception of umami and other delicate flavors, proving that the cutting angle is a tool for both textural modification and flavor amplification.
The choice between a 90-degree and a 45-degree cut is therefore not arbitrary. It is a calculated decision based on the specific collagen and muscle structure of the fish, designed to optimize the mechanical and sensory experience of eating it.
How Lightly Should You Hold the Knife to Feel the Fish Texture?
The correct knife grip for sashimi is not about power; it is about sensitivity. You should hold the knife so lightly that it feels like an extension of your own sensory system. The goal is to achieve maximum tactile feedback from the blade as it passes through the fish. A tight, death grip, common for home cooks, dampens all sensation. It prevents you from feeling the subtle changes in the fish’s texture—the resistance of connective tissue, the softness of the fat, the grain of the muscle.
The professional “pinch grip” is designed for this very purpose. The thumb and forefinger rest on the base of the blade itself, just in front of the handle. The remaining three fingers curl gently around the handle for stability. This grip turns the blade into a probe. Your nerve endings are mere millimeters from the cutting action, allowing you to feel every nuance. You can feel the blade gliding, you can feel if it starts to drag, and you can feel the exact moment the cut is complete. This feedback allows for real-time micro-adjustments, ensuring the pressure and angle are perfect throughout the slice.
Your grip should be just firm enough to guide the knife. The primary force for the cut should come from the knife’s own weight. If you are actively pushing down, your grip is too tight. A master sushi chef can often tell the quality and freshness of a fish simply by the feel of the knife passing through it. This level of sensitivity is only possible with a light, responsive hold that prioritizes feeling over force.
Action Plan: Calibrating Your Grip Pressure
- Practice on soft silken tofu to develop pressure sensitivity; your goal is to slice without crushing.
- Adopt the pinch grip, holding the knife with your thumb and index finger on the blade’s base for maximum feedback.
- Attempt to slice using only the knife’s weight; apply absolutely no additional downward pressure.
- Listen for auditory cues: a faint “hiss” or complete silence indicates a clean cut.
- If you hear or feel any tearing, dragging, or snagging, immediately reduce your pressure and re-evaluate your grip.
Thick Slice or Paper Thin: Which Cut Best Suits White Fish Texture?
The thickness of a sashimi slice is a deliberate choice dictated by the fish’s specific biomechanical properties, primarily its collagen content and muscle firmness. A one-size-fits-all approach will inevitably fail to present each fish in its optimal state. White-fleshed fish, in particular, exhibit a wide range of textures that demand different cutting styles.
For very firm, high-collagen fish like flounder (hirame) or some types of sea bream, a thick slice would be unpleasantly tough and rubbery to chew. The dense network of connective tissue requires mechanical breakdown to be enjoyable. For these fish, the usu-zukuri (paper-thin cut) is employed. Slicing the fish as thinly as possible (1-2mm) dramatically increases the surface area and presents the collagen in a form that melts on the tongue rather than resists the teeth. It is a technique that makes a tough fish tender through geometry.
Conversely, some white fish can be aged. This aging process allows enzymes within the fish to break down the collagen, resulting in a much more tender and flavorful flesh. For an aged, tender white fish, a thin slice would lack substance and fall apart. Here, a thicker, more robust cut like the hira-zukuri (thick, rectangular cut, up to 10mm) is more appropriate. This provides a satisfying mouthfeel and allows the complex, developed flavors of the aged fish to be fully appreciated. The choice of thickness is therefore a direct response to the fish’s cellular and connective tissue structure.
| Fish Type | Texture | Recommended Cut | Thickness |
|---|---|---|---|
| Fresh White Fish | Firm, high collagen | Usu-zukuri (paper thin) | 2mm |
| Aged White Fish | Tender, collagen broken down | Hira-zukuri (thick) | 10mm |
| Flounder/Fluke | Very firm | Usu-zukuri | 1-2mm |
| Sea Bream | Medium firm | Sogi-zukuri (angled) | 3-5mm |
How to Slice Fish for Maximum Flavor Release Using a Standard Chef Knife?
While a long, single-beveled yanagiba is the ideal tool, achieving a respectable sashimi slice is possible with a standard Western-style chef’s knife, provided you understand and compensate for its limitations. The primary challenge is the Western knife’s thicker, V-shaped double-bevel edge, compared to the yanagiba’s acute, single-bevel chisel edge. This V-shape creates more drag and a tendency to steer the cut. However, with meticulous preparation and adapted technique, these can be overcome.
First, absolute, uncompromising sharpness is non-negotiable. A standard knife must be honed to its absolute peak immediately before use. For sashimi, this means progressing through whetstones to a very fine level; where professional sushi chefs maintain their knives at a 1000/6000 grit progression, you must aim for the highest finish your sharpening system allows. A merely “sharp” kitchen knife is not sufficient. It must be scalpel-sharp to minimize cell damage.
Second, the technique must be adapted. You cannot use the entire blade length in the same way. Start the cut further down the blade, in the “belly” area, to avoid the thick heel. As you perform the single-pull draw cut, you must slightly angle the blade to compensate for the V-shaped edge, using your non-dominant guide hand to gently “steer” the slice and maintain a consistent thickness. The key is to still execute a single, continuous pull from the belly to the tip, using as much of the effective cutting length as possible without sawing. It requires more concentration and control than with a specialized knife, but the core principle of a clean, friction-free shear remains the same.
Key Takeaways
- The sawing motion is not a cutting motion; it is a tearing motion that generates frictional heat, microscopically cooking and denaturing the fish’s delicate proteins.
- A perfect slice is a single, continuous “pull cut” that uses the knife’s weight and full length to create a clean shear force, preserving the integrity of individual muscle cells (myocytes).
- The angle and thickness of the cut are not arbitrary; they are biomechanical adjustments made to match the specific collagen content and muscle firmness of the fish to optimize texture.
How to Prevent Rust on Your Carbon-Steel Yanagiba in a Home Kitchen?
A high-carbon steel yanagiba is a precision instrument, but its reactivity means it is highly susceptible to rust (aka-sabi). Unlike the stable, protective blue-grey patina that forms on a well-cared-for blade, red rust is a destructive oxide that pits the steel and compromises its structural integrity. In a home kitchen, where usage may be less frequent than in a professional setting, a strict maintenance protocol is essential to prevent this degradation.
The enemy is moisture. Your goal is to minimize the time water spends on the blade after every single use. A simple wipe-down is insufficient. The moisture hiding at a microscopic level is what allows oxidation to begin. The process must be immediate and thorough: wash the blade with soap and a soft sponge, and then rinse it. This is where the professional technique provides the best solution.
Traditional Japanese Knife Maintenance Protocol
Japanese professional chefs follow a disciplined three-step ritual to ensure their carbon steel blades never rust. First, immediately after washing, they rinse the blade with very hot water. The residual heat from the steel causes the water to evaporate almost instantly, a far more effective drying method than towel-drying alone. Second, once the blade is completely dry and cool, they apply a micro-thin layer of food-grade camellia oil (tsubaki abura) or mineral oil. This creates a hydrophobic barrier, preventing ambient humidity from reaching the steel. Finally, the knife is stored in a wooden sheath, or saya, which not only protects the hyper-sharp edge but also wicks away any residual ambient moisture.
Adopting this three-step process—hot water rinse, oil application, proper storage—is the most effective way to protect your investment. It transforms knife cleaning from a chore into a deliberate ritual that respects the tool and ensures it is always in optimal condition, ready to perform the perfect, cell-preserving cut.
Frequently Asked Questions on Why Sawing Your Fish Destroys the Texture and Flavor Profile?
What’s the difference between protective patina and destructive rust?
A blue-grey patina is a stable oxide layer that protects the blade, while red rust (aka-sabi) pits the surface and damages the steel structure.
How often should I oil my carbon steel knife?
Apply a thin layer of camellia or food-grade mineral oil after each use and thorough drying, especially in humid environments.
Can I use the dishwasher for my yanagiba?
Never. The prolonged moisture exposure and harsh detergents will cause immediate rusting and potentially damage the handle.