Hosting an impressive temaki party on a budget isn’t about expensive ingredients; it’s about mastering the flow of your setup and the physics of your food to prevent chaos and guarantee fun.
- Engineer your temaki bar like an assembly line to eliminate guest traffic jams.
- Master the 30-second “crispness window” to ensure every hand roll is perfect.
Recommendation: Prioritize your layout and timing strategy over splurging on fillings. A smooth, interactive experience is what makes a temaki party truly memorable.
Picture this: a lively table, friends and family laughing, reaching across a vibrant spread of colorful ingredients to build their own perfect sushi hand rolls. A DIY temaki party is the ultimate interactive dining experience—impressive, delicious, and deeply social. But for the host, the vision can quickly be clouded by anxiety. How do you feed 10 people without the cost spiraling out of control? How do you prevent a chaotic traffic jam around the rice bowl? And the biggest fear of all: how do you stop the crisp, savory nori from turning into a chewy, disappointing wrapper?
Many guides will tell you to simply “buy fresh fish” and “prepare in advance,” but they miss the crucial point. A successful temaki party is a game of logistics and physics. It’s less about what you serve and more about *how* you serve it. The secret isn’t in a bigger budget, but in a smarter system. It’s about understanding the science of a crispy nori sheet and the psychology of guest movement.
This guide moves beyond generic advice to give you a party planner’s playbook. We will deconstruct the temaki experience, focusing on the strategic decisions that make all the difference. You’ll learn how to engineer your food station for maximum flow, how to make budget-friendly fillings taste authentically delicious, and the timing secrets to ensure every single cone has that satisfying crunch. Get ready to host a fun, affordable, and completely stress-free temaki party that your guests will be talking about for weeks.
To help you organize the perfect event, we’ve broken down the key strategies into a clear, step-by-step guide. Explore the sections below to master every aspect of your temaki party, from the foundational choices to the pro-level finishing touches.
Summary: How to Host a DIY Temaki Cone Party for 10 Guests on a Budget?
- Half Sheet or Quarter Sheet: What Size Nori Is Best for Temaki?
- How to Arrange Ingredients to Prevent Traffic Jams at the Temaki Bar?
- Smoked Salmon or Canned Tuna: Which Budget Fillings Still Taste Authentic?
- The Timing Mistake That Makes Temaki Nori Chewy and Unpleasant
- How Many Cups of Rice Do You Need per Person for a Temaki Party?
- How to Set Up a ‘Temaki Bar’ for a Quick Weeknight Family Meal?
- Beer First, Sake Later: Why Is This the Traditional Drinking Sequence?
- Why Do Nori Cones Lose Their Crunch in 30 Seconds and How to Fix It?
Half Sheet or Quarter Sheet: What Size Nori Is Best for Temaki?
The very foundation of your temaki cone is the nori sheet, and its size dictates everything from the eating experience to the amount of fillings used. This isn’t just a minor detail; it’s your first strategic decision. The two standard options are half sheets and quarter sheets. While Japanese nori sizing standards define a half sheet as roughly 19 cm x 10.5 cm, the choice depends entirely on your guests and party style.
A half sheet creates a large, substantial, restaurant-style cone. It’s ideal for a main meal where guests will likely make two or three rolls. However, it can be intimidating for beginners and children to handle, often leading to overfilling and spillage. In contrast, a quarter sheet is perfect for smaller, taco-style folds. This size encourages experimentation, allowing guests to sample many different filling combinations. It’s far more manageable for first-timers and kids, which means less mess and less food waste.
To make the right call, think about your audience. Are they experienced sushi lovers or complete novices? A mix? Offering both sizes can be a great solution. For a party of 10, a smart strategy is to default to quarter sheets for accessibility and have a small stack of half sheets available for the more ambitious rollers. This simple choice sets the tone for a low-stress, high-fun event.
This comparative table breaks down the decision-making process, helping you choose the perfect nori size for your party’s needs.
| Feature | Half Sheet | Quarter Sheet |
|---|---|---|
| Size | 19 cm x 10.5 cm | 10.5 cm x 9.5 cm |
| Roll Style | Restaurant-style cone | Home-style taco fold |
| Rice Amount | 2 tablespoons | 1 tablespoon |
| Best For | Experienced rollers | Beginners & children |
| Eating Experience | More substantial meal | Tasting portions |
Ultimately, choosing the right nori size is your first step in preventing guest friction. By matching the sheet size to your guests’ experience level, you’re proactively designing a smoother, more enjoyable experience for everyone.
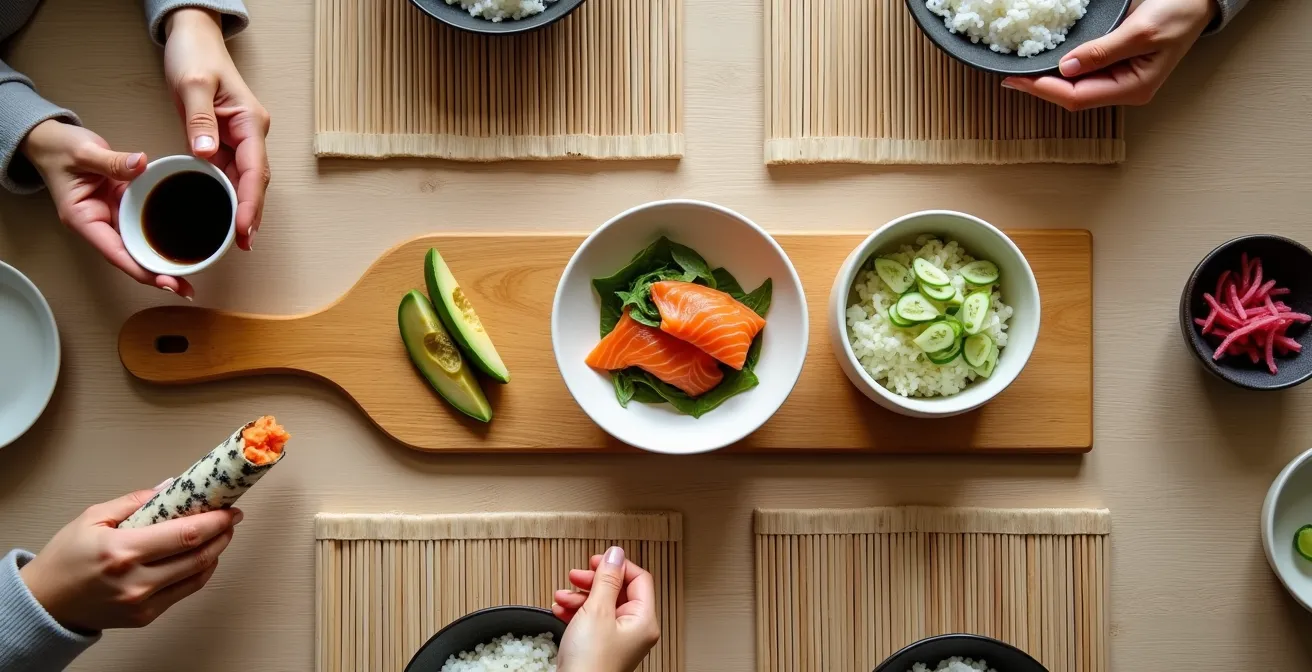
How to Arrange Ingredients to Prevent Traffic Jams at the Temaki Bar?
The biggest enemy of a relaxed temaki party is a poorly designed layout. When ten people converge on a single bowl of avocado, you get bottlenecks, frustration, and a messy station. The solution is to think like a party planner and apply some basic “flow engineering.” Your goal is to create a logical, intuitive assembly line that guides guests smoothly from start to finish, preventing jams before they can form.
The process should be linear. Start with the plates, followed by the warm sushi rice—the first ingredient everyone needs. Then, arrange the nori sheets. After the fundamentals, lay out the proteins, followed by the array of vegetables and garnishes. Finally, place the sauces and toppings like sesame seeds at the very end of the line. This ensures guests aren’t lingering at the start of the bar trying to drizzle soy sauce over their empty nori. For a party of 10, the most effective strategy is to create duplicate stations for the most popular items, especially the rice and key fillings like spicy tuna or avocado. Placing identical bowls at opposite ends of the table instantly halves the traffic.
This overhead view illustrates the power of a well-designed layout. A linear flow is efficient, while a centralized, disorganized setup can quickly lead to congestion.
As you can see, organizing your ingredients in a logical sequence is the secret to delicious chaos control. Providing serving spoons or tongs for every single ingredient is also a non-negotiable rule to keep things moving and hygienic. Think of your temaki bar not as a static display, but as a dynamic, interactive system you are designing for peak efficiency and fun.
By investing a few minutes in strategic placement, you transform your role from a frantic restocker into a relaxed host who can actually enjoy the party alongside their guests.
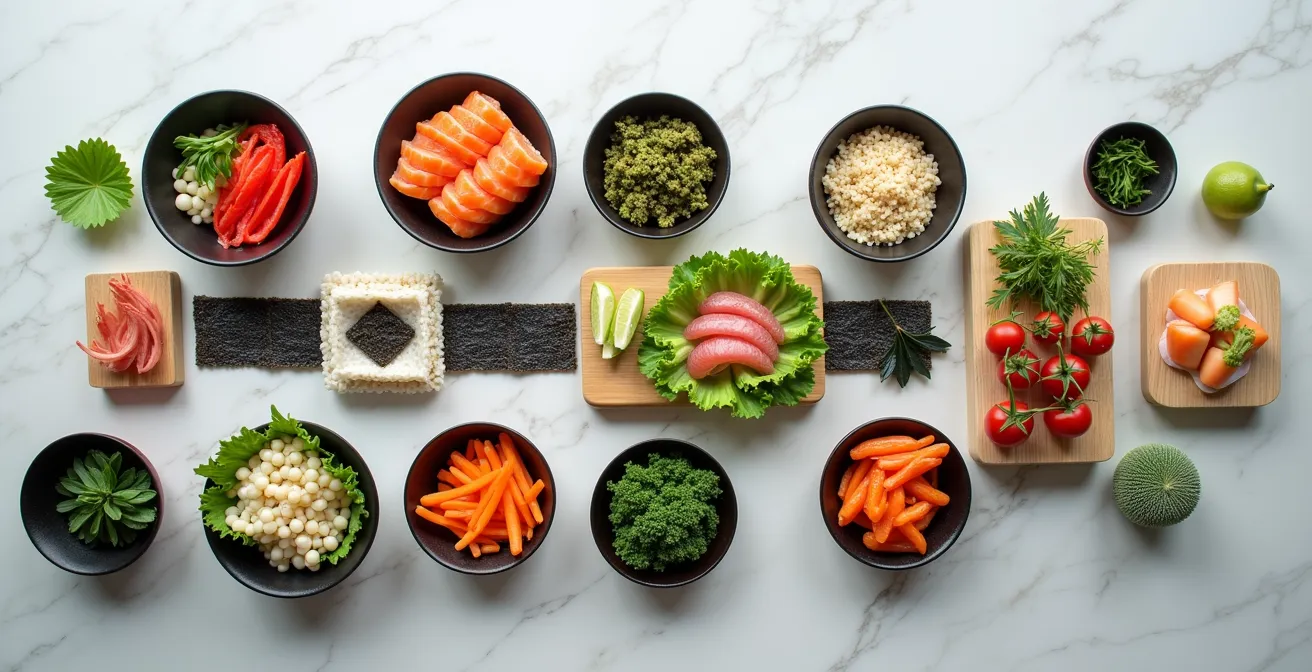
Smoked Salmon or Canned Tuna: Which Budget Fillings Still Taste Authentic?
The dream of serving glistening, sashimi-grade tuna can quickly clash with the reality of a party budget. The good news is that “authentic” doesn’t have to mean expensive. The key to a successful and affordable temaki party is strategic resource allocation: balancing one or two “premium” items with a variety of delicious, budget-friendly fillings. Guests will be more impressed by the variety and abundance than by a single, pricey ingredient.
Smoked salmon is a fantastic mid-range option that delivers a premium feel without the cost of raw, sushi-grade fish. It’s a flavor guests know and love, and it works beautifully in temaki. But the real budget hero is canned tuna. Don’t just scoop it from the can; with a little “umami elevation,” you can transform it into a creamy, spicy filling that rivals any sushi bar. Simply drain the tuna well, flake it, and mix it with Kewpie mayonnaise, a dash of sriracha, and a little sesame oil. The result is a crowd-pleasing filling that costs a fraction of fresh fish.
Don’t forget classic, inexpensive, and truly authentic vegetarian options. A homemade tamagoyaki (Japanese rolled omelet) is incredibly cheap to make and adds a touch of sweetness. Julienned cucumbers, avocado, and seasoned shiitake mushrooms also add texture, flavor, and color to the spread, making the entire bar feel more luxurious and complete. The MOSHIMO restaurant in Brighton’s successful temaki party concept, which mixes premium sashimi with budget-friendly katsu and vegetables, proves this high-low strategy is a winner.
This table gives a clear idea of how costs break down, showing that a satisfying and authentic experience is easily achievable on a budget.
| Filling Type | Cost per 10 guests | Authenticity Rating |
|---|---|---|
| Raw Tuna (Sashimi-grade) | $60-80 | Premium authentic |
| Smoked Salmon | $25-35 | Western-fusion authentic |
| Canned Tuna (elevated) | $10-15 | Casual authentic |
| Tamagoyaki (egg omelet) | $5-8 | Traditional authentic |
| Seasoned Shiitake | $8-12 | Vegetarian authentic |
Ultimately, a successful temaki bar is about abundance and choice. By cleverly mixing high and low, you give your guests a rich, satisfying experience while keeping your wallet happy.
The Timing Mistake That Makes Temaki Nori Chewy and Unpleasant
You’ve engineered the perfect layout and curated a delicious spread of fillings. But all that work can be undone in 30 seconds by the single greatest enemy of good temaki: moisture. The moment warm, wet sushi rice touches a sheet of nori, a countdown begins. The delightful, shatteringly crisp texture that defines a great hand roll begins to degrade immediately. This isn’t an exaggeration; testing shows that temaki must be eaten immediately, as nori can become noticeably soggy in under a minute.
This critical period is the “crispness window.” The number one mistake hosts and guests make is assembling a roll and then pausing to chat or select more toppings. By the time they take a bite, the nori has lost its structural integrity and turned from crisp to chewy. The magic is gone. As the host, your job is to educate your guests on this crucial rule in a fun, lighthearted way. Frame it as part of the game: “The rule of temaki is build it, then bite it, right away!”
Visually, the transformation is dramatic. A pristine sheet of nori is glossy and brittle, but exposure to the moisture in the rice causes it to soften and wrinkle almost instantly.
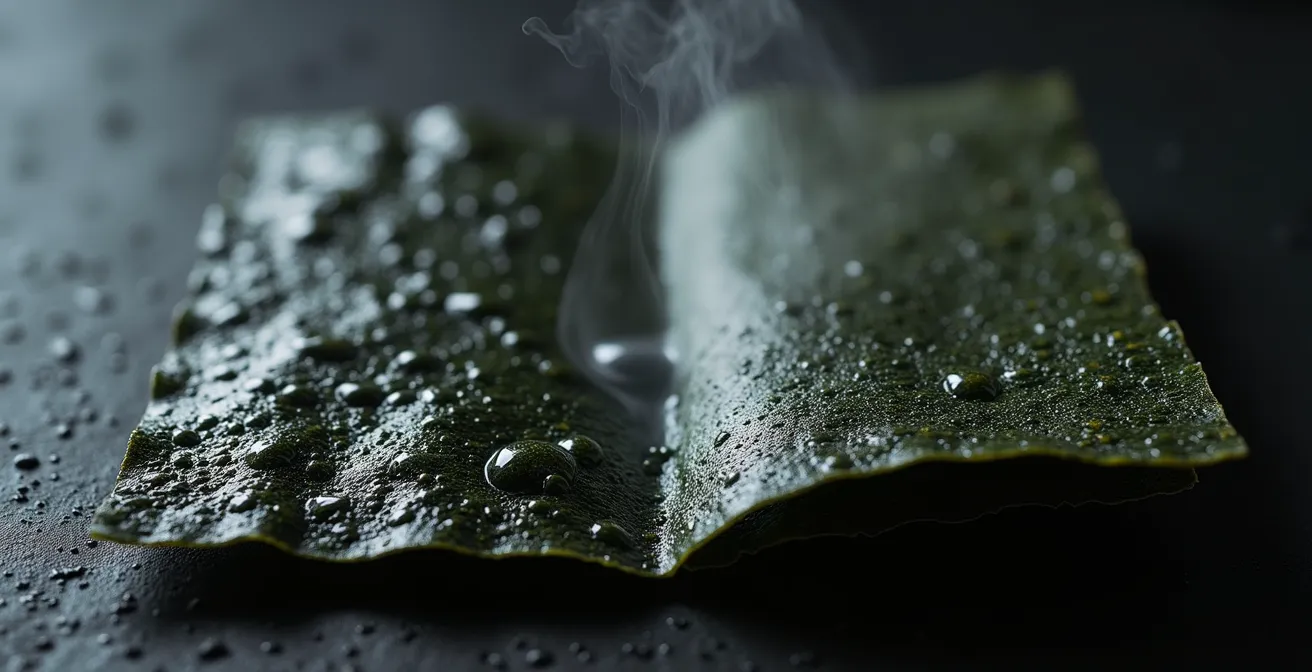
To help your guests succeed, encourage a two-step process. First, they should take a sheet of nori, add a small amount of rice, and their main fillings. Second, they should roll and eat that cone immediately. If they want to add sauces or other toppings, they can add them just before the final fold. This “build-and-bite” rhythm is the true secret to the perfect temaki experience.
By managing the “crispness window,” you’re not just serving food; you’re curating an authentic sensory experience. The sound of that crunch is the sound of your success as a host.
How Many Cups of Rice Do You Need per Person for a Temaki Party?
Rice is the heart of a temaki party—it’s the canvas for all the other flavors. Running out mid-party is a disaster, but making far too much is a waste. So, what’s the magic number? While it can vary based on your guests’ appetites, a reliable and widely-used benchmark exists. For a party, professional sushi chefs recommend a ratio of about 0.75 to 1 cup (150-200g) of uncooked short-grain rice per person. For your party of 10, aiming for 8-10 cups of uncooked rice is a safe and solid bet.
This quantity ensures you have an abundant supply for the main event, and likely a little extra. It’s always better to have a bit too much than not enough. Remember, the rice needs to be seasoned with a mixture of rice vinegar, sugar, and salt while it’s still warm to become proper “sushi rice.” Making this large a batch requires a big bowl and some muscle to fold and fan the rice to cool it down to body temperature before serving. A rice cooker is your best friend here, as it can keep the rice at a perfect, slightly warm temperature throughout the party.
But what if you do end up with leftovers? Don’t despair. Leftover sushi rice can be the star of other delicious meals. Think of it as a “bonus” for your hosting efforts. Here’s a simple insurance plan for any remaining rice:
- Day 1 After: Make Yaki Onigiri. Form the leftover rice into triangles or patties, brush with soy sauce, and grill or pan-fry them until the outside is crispy and golden.
- Day 2 After: Prepare Chazuke. Place a scoop of rice in a bowl, add your favorite toppings (like leftover salmon or sesame seeds), and pour hot green tea or dashi broth over it for a comforting and quick meal.
- Freeze for Later: Portion the rice into airtight freezer bags. It can be kept for several weeks and easily reheated for a future meal.
By planning your rice quantity and having a delicious leftover strategy, you remove one of the biggest potential stressors from the equation, ensuring a smooth and plentiful feast.
How to Set Up a ‘Temaki Bar’ for a Quick Weeknight Family Meal?
The fun of a temaki party isn’t just for big weekend gatherings. The entire concept can be brilliantly scaled down for a fast, interactive, and exciting weeknight family dinner. The key is ruthless efficiency and simplification. You don’t need two dozen filling options; 4-5 well-chosen ingredients are more than enough to create a sense of choice and fun for a smaller group.
The “single platter” system is a game-changer for weeknight meals. Instead of setting up a long buffet, arrange all your prepped ingredients—rice, nori, and fillings—on one large serving platter or baking sheet. This makes transport from the kitchen to the table a one-trip affair and contains the mess for incredibly easy cleanup. A family in one case study perfected this by incorporating planned leftovers, like teriyaki chicken from the previous night, reducing prep time to under 15 minutes.
For sauces, use squeeze bottles for soy sauce and spicy mayo. This minimizes the risk of spills, especially with kids, and makes cleanup a breeze. Keeping the rice in a rice cooker on the “warm” setting on the table ensures everyone gets perfectly tempered rice for every roll they make. This small-scale temaki bar transforms a regular dinner into a memorable family activity, getting everyone involved in making their own meal.
Your 15-Minute Weeknight Temaki Setup Plan
- Use a rice cooker on the “warm” setting to keep rice perfect throughout the meal.
- Arrange all ingredients on a single large baking sheet for easy transport and cleanup.
- Pre-cut nori sheets (quarter-size is ideal for kids) and store them in their original resealable bag to maintain crispness.
- Use squeeze bottles for sauces like soy sauce and Kewpie mayo to minimize mess and cleanup.
- Repurpose leftover proteins from previous meals, such as rotisserie chicken or grilled salmon, for ultra-fast prep.
By embracing a few simple shortcuts, you can bring the interactive joy of temaki to your family table any night of the week, turning dinnertime into a fun, hands-on event.
Beer First, Sake Later: Why Is This the Traditional Drinking Sequence?
Just as important as the food is the flow of drinks, which adds another layer of authenticity and fun to your party. In Japan, there’s a common and traditional sequence to an evening of drinking that works perfectly for a temaki party: start with beer, then transition to sake. This isn’t an arbitrary rule; it’s rooted in social custom and palate science.
The practice often begins with the phrase “Toriaezu Bīru,” which loosely translates to “a beer for now.” This tradition is beautifully explained by Japanese dining customs:
Toriaezu Bīru translates to ‘a beer for now’ – a light, crisp Japanese lager is seen as the perfect social icebreaker and palate cleanser to start an evening.
– Traditional Japanese dining customs
A light, crisp Japanese lager like Asahi or Kirin is the perfect social lubricant. It’s refreshing, easy to drink, and quenches the initial thirst as guests arrive and begin to mingle. It cleanses the palate and prepares it for the more complex flavors to come. It’s the communal “cheers” that officially kicks off the party.
Once the initial flurry of activity settles and guests are more focused on pairing flavors with their hand rolls, it’s the perfect time to introduce sake. A versatile, dry sake like a Junmai or Ginjo grade works wonderfully with a wide range of seafood and vegetable fillings. Sake is meant for slower sipping, encouraging guests to appreciate the nuanced interplay between their drink and their food. For a budget-conscious host, this sequence is also strategic:
- Buy one case of a single, crowd-pleasing Japanese lager for simplicity and volume.
- Select just one or two quality bottles of versatile sake for the “food pairing” phase.
- Serve beer first to handle the initial thirst, making the more expensive sake last longer.
- This approach, according to some guides, keeps beverage costs around 400-1000 yen (roughly $3-7) per person.
By following this simple drinking progression, you not only guide your guests through an authentic cultural experience but also manage your beverage budget like a seasoned pro.
Key Takeaways
- The size of your nori (half vs. quarter sheet) is a strategic choice that impacts guest experience and food waste; choose based on your guests’ skill level.
- An efficient, linear layout for your temaki bar is the secret to preventing traffic jams and creating a smooth, interactive flow for everyone.
- Mastering the “crispness window” is non-negotiable: educate guests to build and eat their rolls immediately to avoid soggy, chewy nori.
Why Do Nori Cones Lose Their Crunch in 30 Seconds and How to Fix It?
We’ve established that the “crispness window” is short, but why exactly does nori surrender to sogginess so quickly? The answer lies in its physical properties. Nori is essentially a very thin, very dry sheet of roasted seaweed. It is highly hygroscopic, which is a scientific term meaning it’s incredibly effective at absorbing moisture from its environment. In fact, food science research confirms that nori’s structure is designed to absorb moisture within 30-60 seconds of contact with a wet ingredient like sushi rice.
So, now that we understand the science of the problem, how do we actively fight it? Beyond just telling guests to eat quickly, there are several pro-level techniques you can employ to extend that precious crunch time. The first line of defense is buying the best quality nori you can afford. Look for premium “gold grade” nori, often from Japan’s Ariake Sea, as it tends to be thicker and more resistant to moisture.
The next strategy is to create a moisture barrier. Just before adding the rice, you can lay down a protective layer. A shiso leaf is the traditional choice, but a very thin spread of Kewpie mayonnaise across the nori also works wonders as a delicious, fatty barrier. Finally, how you store and handle the nori is critical. Keep the package sealed with its silica gel packet until the very moment the party starts. Any exposure to ambient humidity can begin the softening process before it even hits a plate. For the ultimate crunch, some enthusiasts even set up a DIY toasting station, briefly passing each nori sheet over a flame or a hot toaster to drive out any trace of moisture right before using it.
Now that you’re armed with the science and strategy for every element of the party, from flow and fillings to the physics of the perfect crunch, you are fully equipped to host a DIY temaki night that is not only affordable and impressive but also genuinely fun and stress-free for you and all your guests.