Making impressive sushi at home is far easier when you skip the difficult rolls and focus on simple, ‘forgiving forms’ first.
- Temari sushi requires no special tools or rolling skills, just simple shaping with plastic wrap.
- Gunkan “battleship” sushi neatly contains loose or wet toppings without the risk of a roll falling apart.
- Even a “failed” overstuffed roll can be transformed into a delicious and intentional chirashi bowl.
Recommendation: Start with Temari sushi for a guaranteed-to-impress, stress-free introduction to the art of sushi assembly.
The dream of presenting a beautiful platter of homemade sushi often crashes into a single, intimidating image: the perfectly formed sushi roll. For many aspiring home chefs, the fear of torn nori, sticky rice disasters, and rolls that refuse to close is enough to keep them from even starting. The internet is full of advice that centers on mastering these complex rolls, suggesting that this is the only “real” way to make sushi. This pressure to achieve perfection right out of the gate can be completely overwhelming, turning a fun culinary project into a stressful test.
But what if the secret to delicious, impressive homemade sushi wasn’t about conquering the difficult roll on your first try? What if the key was to embrace the wonderful variety of the sushi world and start with its most forgiving forms? This guide is built on a simple, encouraging principle: flavor over form. We will explore sushi not as a rigid discipline, but as a creative and joyful act of assembly. You’ll discover that some of the most beautiful and delicious types of sushi require no rolling mat, no expert pressure-control, and no years of training—just fresh ingredients and a willingness to play with your food.
We’ll begin with the easiest and most playful style, then move on to other simple forms that solve common beginner problems. We will tackle the classic roll, but with a surprising twist on what’s actually easier. Finally, you’ll learn how to plan a full platter and even host a fun, budget-friendly sushi party. Let’s leave the pressure behind and start your journey into the delightful world of accessible, homemade sushi.
This article provides a step-by-step path to building your sushi-making confidence, starting with the simplest techniques and moving toward more creative applications. The following sections are designed to guide you through each style and challenge.
Summary: A Home Chef’s Path to Sushi Confidence
- Why Temari Sushi Is the Easiest Style for Kids and Beginners to Make
- How to Wrap Nori Around Rice for Gunkan Without It Getting Soggy
- Classic Roll or Inside-Out: Which One Is Actually Harder to Roll?
- The ‘Burrito Effect’: Why Your Overfilled Rolls Cannot Be Closed
- How to Plan a Sushi Platter That Balances Colors and Textures
- Naruto Style: Is Sushi Without Rice Still Sushi?
- Can Day-Old Rice Be Re-Seasoned for a Decent Lunch Bowl?
- How to Host a DIY Temaki Cone Party for 10 Guests on a Budget?
Why Temari Sushi Is the Easiest Style for Kids and Beginners to Make
If the thought of rolling sushi makes you anxious, let’s start by getting rid of the rolling mat entirely. Meet Temari sushi: delightful, colorful spheres of rice and toppings that are incredibly simple to make. Their name comes from “temari,” traditional Japanese handballs, which these little sushi balls resemble. In Japan, they are often served during happy occasions like Hinamatsuri (Girl’s Day), a testament to their fun and festive nature. This is the ultimate starting point for any beginner because it replaces tricky technique with a foolproof method that guarantees a beautiful result every time. The key is a simple piece of plastic wrap.
The process is more like creative assembly than technical cooking. You simply place your topping (like a thin slice of salmon or avocado) onto a piece of plastic wrap, add a small ball of seasoned sushi rice, and then gather the corners of the wrap and twist. This gentle pressure is all it takes to form a perfectly round, compact ball. There’s no risk of tearing nori or uneven rolling. It’s a wonderfully forgiving form that allows you to focus on beautiful ingredient combinations rather than wrestling with technique.
This method is so straightforward and fun that it’s a perfect activity to do with kids. They can safely choose their own toppings and twist their own little sushi balls. The plastic wrap ensures their hands stay clean and the rice doesn’t stick to everything. Below is the simple three-step process to get started.
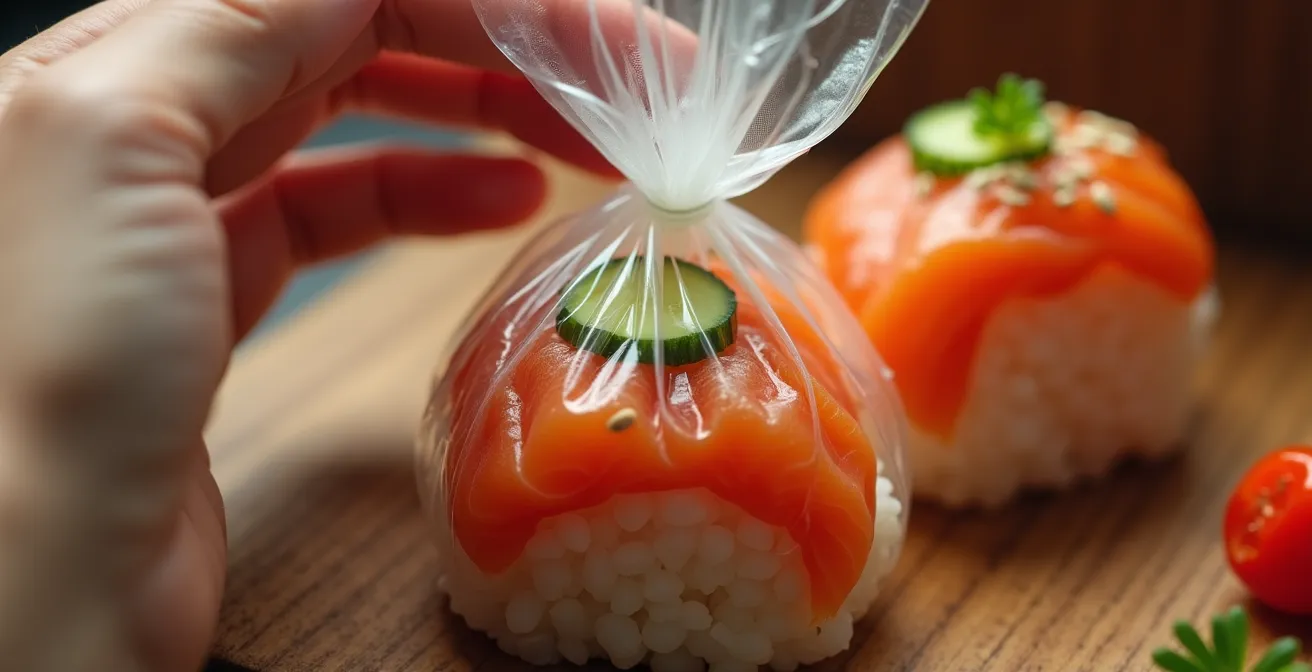
As you can see, the technique is all about the twist. This makes it an ideal introduction to handling sushi rice and toppings in a low-pressure way. The following steps outline this process in detail, proving just how accessible this elegant style can be for your first attempt at making sushi at home.
3 Simple Steps to Perfect Temari Sushi Balls
- Wet your hands thoroughly with cold water to prevent rice from sticking while you form a small, loosely packed ball.
- Place your desired topping face-down on a square of plastic wrap, then add the small ball of seasoned sushi rice on top of it.
- Gather the corners of the plastic wrap together and twist tightly to form a perfect, compact sphere—no special skills needed.
By starting with Temari, you build immediate confidence. You prove to yourself that you can create beautiful, delicious sushi, which provides the perfect motivation to explore other styles.
How to Wrap Nori Around Rice for Gunkan Without It Getting Soggy
Once you’re comfortable handling rice, the next step is introducing nori (seaweed). But instead of a full roll, we’ll start with Gunkan-maki, or “battleship sushi.” This style is brilliant for beginners because it’s designed to securely hold loose toppings like fish roe (tobiko), chopped scallops, or corn salad that would otherwise fall out of a roll. The structure is simple: a tall oval of rice wrapped with a “wall” of nori, creating a little cup to be filled. The biggest challenge here isn’t rolling, but a common beginner’s nightmare: soggy nori. A crisp nori wall provides a satisfying texture, while a limp, chewy one can ruin the experience.
The secret to perfectly crisp nori lies in timing and preparation. Professionals use a few key tricks. First, toasting the nori sheet for just a few seconds over a low flame or in a dry pan dramatically enhances its crispness and flavor. Second, it’s crucial to minimize the time the nori is in contact with the moist rice. This means you should prepare all your rice bases first, let them rest for a moment to allow the surface to dry slightly, and then wrap them with the nori strip immediately before you plan to serve. Delaying this final step is the number one cause of sogginess.
Another pro tip is to use Tezu, a vinegared hand-dipping water. Moistening your hands with a mix of water and rice vinegar not only prevents the rice from sticking but also adds a subtle layer of flavor and helps keep everything clean. By preparing your components in advance and assembling your Gunkan-maki at the last minute, you can serve up a dish with a delightful textural contrast between the soft rice, creamy topping, and perfectly crisp nori wall.
To ensure your nori stays crisp for as long as possible, especially when preparing for guests, consider how you store it. As this comparative analysis of storage methods shows, the right approach depends on your serving timeline.
| Storage Method | Crispness Duration | Best For |
|---|---|---|
| Sealed container with silica packet | 2-3 hours | Party preparation |
| Toasted and immediate use | 10-15 minutes | Restaurant-style service |
| Pre-cut strips in airtight bag | 1 hour | Home dinner service |
Mastering Gunkan-maki is a huge step. It teaches you how to handle nori and create a stable structure for a wide variety of delicious, loose fillings, expanding your sushi repertoire far beyond simple toppings.
Classic Roll or Inside-Out: Which One Is Actually Harder to Roll?
Now, it’s time to face the main event: the sushi roll. Most beginners assume the classic roll (hosomaki), with nori on the outside, is the easier starting point. It looks simpler, cleaner, and more traditional. However, this is a common misconception. For a first-timer, the inside-out roll (uramaki), with rice on the outside, is often a more forgiving and successful choice. The reason lies in how each style handles the two trickiest elements: rice management and pressure control.
In a classic roll, the nori is your first layer. The main challenge is applying the perfect, even pressure as you roll. Too little pressure, and the roll is loose and falls apart. Too much, and the delicate nori can tear, especially if it gets too moist from the rice. Any imperfection in your rolling technique is immediately visible on the dark, smooth surface of the nori. There’s nowhere to hide a wrinkle or a tear.
Conversely, the uramaki roll starts with a layer of rice on your plastic-wrapped bamboo mat. This presents a different challenge: the rice is sticky and can feel chaotic. However, the plastic wrap is your best friend here, preventing the rice from sticking to the mat. The true advantage comes during rolling. The outer layer of rice is far more forgiving than nori. It can be molded and compressed more easily, and it effectively hides minor imperfections in your filling or rolling technique. A slight gap or an unevenly placed ingredient is much less noticeable when concealed by a blanket of rice. For beginners, this higher forgiveness factor can be the difference between a frustrating failure and a proud success.
The difficulty of each roll type can be broken down by its main challenges and forgiveness factor, making the choice clearer for a home cook.
| Aspect | Classic Roll (Hosomaki) | Inside-Out (Uramaki) |
|---|---|---|
| Main Challenge | Pressure control – nori tears easily | Rice management – sticks to everything |
| Forgiveness Factor | Low – flaws visible on nori | High – rice layer hides imperfections |
| Essential Tool | Bamboo mat only | Plastic wrap over mat (mandatory) |
| Success Rate for Beginners | 60-70% | 75-85% with plastic wrap |
So, while it may seem counter-intuitive, starting your rolling journey with an inside-out roll protected by plastic wrap is the smarter, less stressful path to building the muscle memory needed for perfect rolls of any kind.
The ‘Burrito Effect’: Why Your Overfilled Rolls Cannot Be Closed
You’ve chosen your roll style, laid out your rice, and artfully arranged your fillings. You begin to roll with confidence, but then it happens: the nori sheet won’t close. The roll is too thick, the fillings are spilling out, and you’re left with what looks more like a messy sushi burrito than an elegant maki roll. This is the “Burrito Effect,” and it’s perhaps the most common and frustrating failure for beginner sushi makers. The cause is almost always the same: overfilling. It’s tempting to load up your roll with generous amounts of every delicious ingredient, but this is precisely what prevents a tight, clean seal.
Professional sushi chefs adhere to strict principles of proportion. The key is to think in thirds. A powerful guideline is the ‘Rule of Thirds’: your fillings should only occupy about one-third of the rice-covered nori sheet, positioned closest to you. This leaves a solid two-thirds of just rice to wrap around the filling, ensuring there is enough surface area to create a secure seal. Furthermore, you must leave a one-inch gap of bare nori at the top edge of the sheet. This exposed strip is what you’ll moisten with a little water to act as the “glue” that seals the roll shut. Without that gap, the rice-covered edges can’t stick together.
The shape of your ingredients also matters immensely. Cut all your fillings, like cucumber, avocado, and fish, into long, thin batons that are roughly the thickness of a pencil. Uniformly sized ingredients lie flat and compact, preventing awkward bumps that create gaps and push the roll apart. By respecting these proportions—thinly sliced fillings, the ‘Rule of Thirds,’ and the essential top gap—you trade a bit of filling quantity for a huge gain in structural integrity, finally conquering the dreaded ‘Burrito Effect’.
Your Action Plan: Auditing Your Sushi Roll Technique
- Ingredient Prep: Are all your fillings cut into thin, uniform batons (pencil-thick) to ensure they lay flat and compact?
- Rice Layer: Have you spread a thin, even layer of rice, leaving a clear 1-inch gap of bare nori at the top edge for sealing?
- Filling Proportion: Do your fillings occupy only the one-third of the rice area closest to you, adhering to the ‘Rule of Thirds’?
- Rolling Pressure: Are you applying firm, even pressure with your bamboo mat to compact the roll as you go, tucking the edge tightly over the fillings?
- Salvage Plan: If it fails, do you have a plan to turn the ingredients into a delicious chirashi bowl, embracing the “flavor over form” mindset?
And remember, even if a roll doesn’t work out, don’t throw it away! A “failed” roll can be easily deconstructed into a beautiful and delicious chirashi sushi bowl. Simply scoop the rice into a bowl and artfully arrange the fillings on top. This isn’t a failure; it’s just another delicious, and intentional, way to enjoy sushi.
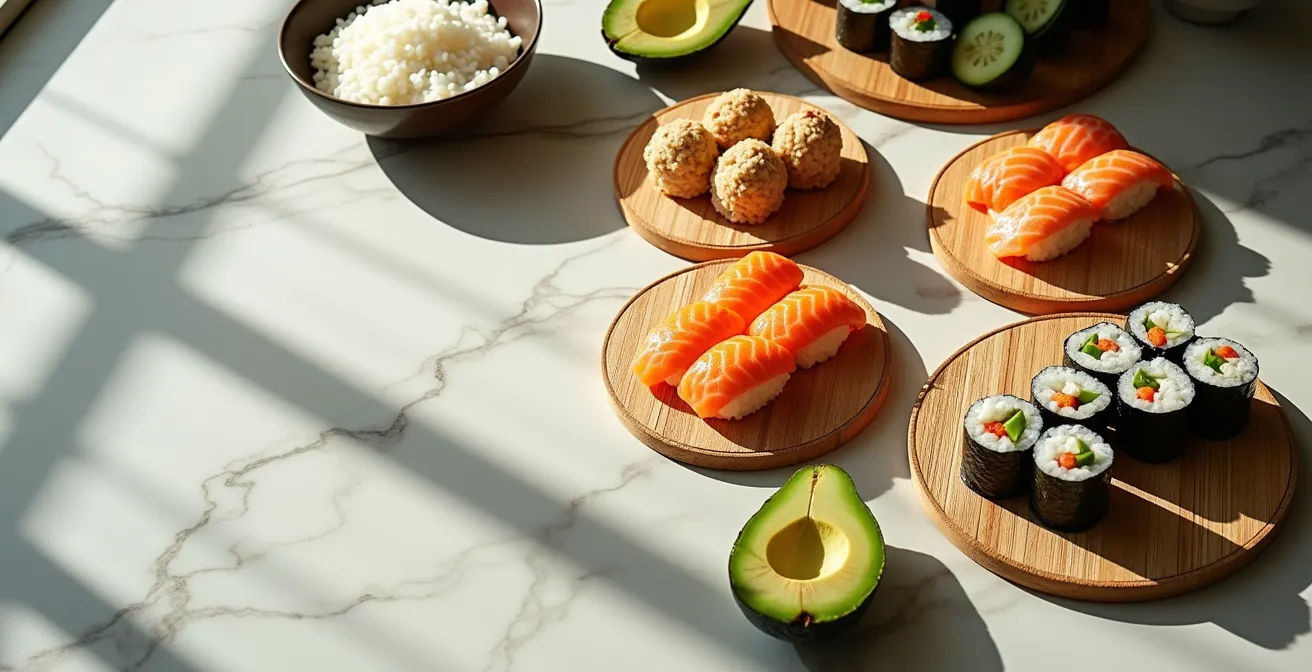
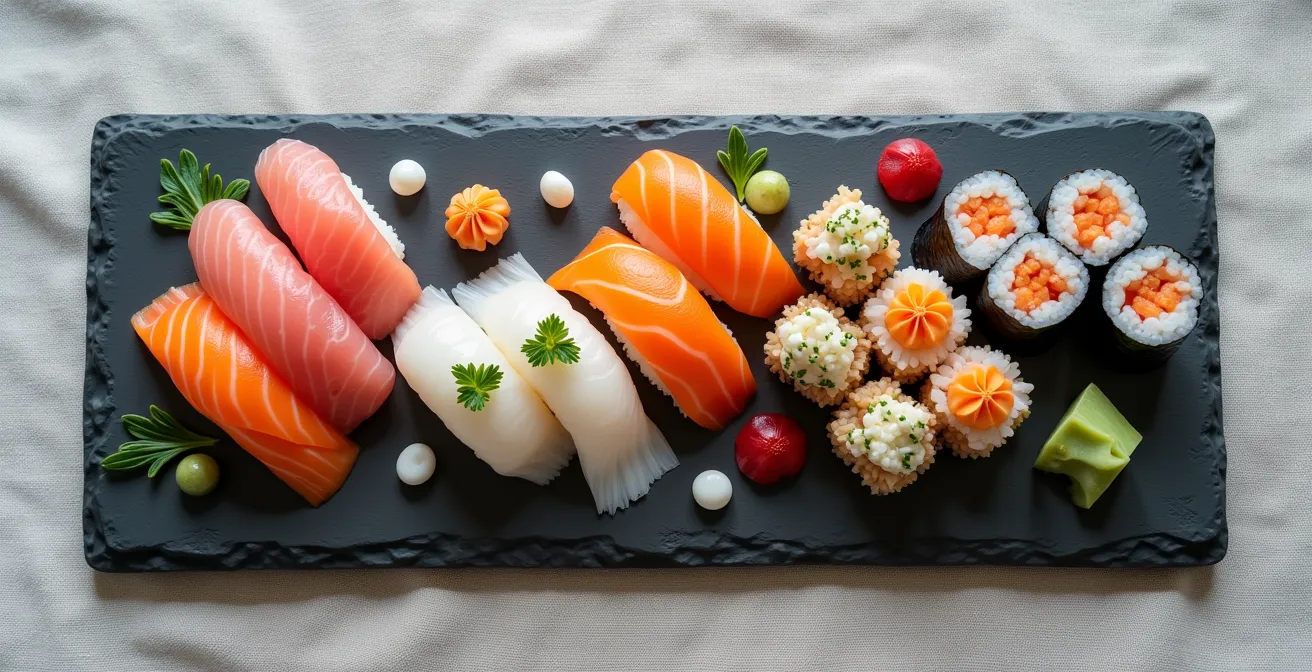
How to Plan a Sushi Platter That Balances Colors and Textures
Once you’ve practiced a few different sushi styles, the next exciting step is to combine them into a stunning platter. A truly impressive sushi platter is more than just a collection of pieces; it’s a work of art that balances colors, textures, and flavors. Thinking like a visual artist will elevate your homemade sushi from simply tasty to truly spectacular. The goal is to create a feast for the eyes before anyone even takes a bite. This means moving beyond a single type of roll and incorporating a variety of forms like nigiri, gunkan, and colorful temari.
Start by planning a color palette. As experts from the traditional cooking guide Just One Cookbook advise, you should aim for high contrast. Pair the vibrant pink of salmon or red of tuna with the bright green of avocado or cucumber. Incorporate the sunny yellow of tamagoyaki (Japanese omelet) or the gleaming orange of tobiko (flying fish roe). Even simple garnishes can make a huge impact. A tiny dab of green wasabi, a few black sesame seeds, or a bright orange, flower-shaped carrot slice can transform a plain-looking piece into something special.
Texture is just as important as color. A great platter offers a journey of sensations. Contrast the soft, silky texture of a salmon nigiri with the satisfying crunch of a cucumber maki. Follow the smooth, delicate surface of a shrimp temari with the exciting popping sensation of an ikura (salmon roe) gunkan. By thoughtfully combining different sushi types, you create a dynamic and engaging eating experience. For example, a platter featuring a few inside-out rolls with sesame seeds, some colorful temari balls, and a couple of tobiko-topped gunkan will instantly look more sophisticated and appealing than a platter of just one type of roll.
Use contrasting colors like red (tuna) and green (avocado). Decorate Temari Sushi with colorful garnish that pops such as ikura (salmon roe), flower-shaped carrots, nori (seaweed) strips, thinly sliced lemon, chives, or microgreens. The key is to mix, match and layer.
– Just One Cookbook, Traditional Japanese Cooking Guide
Ultimately, planning a platter is where your creativity can truly shine. It’s the moment you transition from just following steps to designing a complete culinary experience for yourself and your guests.
Naruto Style: Is Sushi Without Rice Still Sushi?
As you become more comfortable making sushi, you might wonder about low-carb or alternative versions. This leads to an interesting question: if you remove the rice, is it still sushi? Traditionally, the answer is no. The word “sushi” actually refers to the seasoned vinegared rice (su = vinegar, meshi = rice), not the fish. The original purpose of sushi was to preserve fish in fermented rice. Therefore, from a purely historical and etymological standpoint, a riceless roll is not technically sushi.
However, modern cuisine is all about evolution and adaptation. Globally, “sushi” has come to describe the format and presentation style as much as the ingredients. This has given rise to creative, riceless alternatives like the “Naruto roll,” which uses a paper-thin sheet of cucumber as a wrapper instead of rice and nori. These riceless styles are a fantastic way to enjoy the fresh flavors of sushi fillings in a lighter, keto-friendly format. They offer a refreshing crunch and allow the taste of the fish and vegetables to be even more prominent.
Creating riceless wrappers at home is a great way to expand your “deconstructed sushi” repertoire. A vegetable peeler can be used to create long, thin ribbons of cucumber that can be overlapped to form a wrapper. For those more ambitious, mastering the Japanese katsuramuki technique allows you to turn a daikon radish into a continuous, paper-thin sheet. Even simpler alternatives exist, such as colorful soy paper (mamenori) or lightly blanched cabbage leaves. As a deep dive into sushi’s history reveals, using fresh, unpreserved fish is a relatively modern development, so embracing new formats like riceless rolls is simply the next step in this food’s long evolution.
The Etymology and Evolution of ‘Sushi’
The term ‘sushi’ originally referred specifically to the vinegared rice (‘su’ meaning vinegar + ‘meshi’ meaning rice), making riceless versions technically not sushi by traditional definition. However, modern global interpretation has expanded to encompass the format and presentation style, accepting riceless creations like Naruto rolls as part of the broader sushi family.
So while a purist might argue, the modern home chef can confidently embrace these riceless “forgiving forms” as a legitimate and delicious part of their sushi-making journey, prioritizing flavor and personal dietary needs over rigid definitions.
Can Day-Old Rice Be Re-Seasoned for a Decent Lunch Bowl?
Any home cook who has made sushi knows the golden rule: sushi rice must be fresh. Once refrigerated, it becomes hard, dry, and loses its signature fluffy texture. This is due to a process called starch retrogradation, where the starch molecules recrystallize as they cool, squeezing out moisture. But does this mean your leftover rice is destined for the trash? Absolutely not. While it’s true that you can’t revive it for traditional soft sushi rolls, you can transform it into something arguably even more delicious: a crispy rice bowl.
The trick is to stop fighting the hardened texture and start embracing it. By pan-frying the cold rice in a little oil, you can create a “pancake” with an irresistibly golden, crispy bottom and a tender interior. This creates a fantastic textural base for a deconstructed sushi bowl. The process is simple: break up the cold rice into chunks, press it into a hot, oiled pan, and let it cook without moving it for 4-5 minutes until a deep golden-brown crust forms. Flip it, crisp the other side briefly, and then slide it into a bowl.
Now for the fun part. Top your crispy rice base with all your favorite sushi ingredients. A scoop of spicy tuna or salmon, creamy avocado slices, a drizzle of eel sauce and spicy mayo, and a sprinkle of sesame seeds and scallions can turn yesterday’s leftovers into a restaurant-quality lunch. This “flavor over form” approach is the essence of resourceful home cooking. Instead of mourning the loss of perfect sushi rice texture, you celebrate a new and exciting one, proving that even day-old rice can have a delicious second life in your kitchen.
The Crispy Rice Bowl Transformation Method
- Break your cold, day-old sushi rice into small chunks in a bowl. Do not try to separate every grain.
- Heat about 2 tablespoons of a neutral oil in a wide, non-stick pan over medium-high heat until it shimmers.
- Press the rice chunks firmly into the pan to form a single, even “pancake.” Cook undisturbed for 4-5 minutes until a deep golden, crispy bottom forms.
- Carefully flip the rice pancake (using a large spatula or by sliding it onto a plate and inverting it back into the pan) and crisp the other side for 2-3 minutes.
- Slide the crispy rice into a bowl and top with your favorite sushi fillings like spicy tuna, avocado, and drizzles of sauce.
This technique not only saves food but also adds an entirely new and exciting dish to your repertoire, one that celebrates texture and bold flavors in a completely different way from traditional sushi.
Key Takeaways
- Start with Temari sushi; it’s the most forgiving form for beginners, requiring no special tools or rolling skills.
- To prevent soggy nori for Gunkan sushi, toast the sheets briefly and assemble them immediately before serving.
- Inside-out rolls (uramaki) are often easier for beginners than classic rolls because the outer rice layer hides imperfections.
How to Host a DIY Temaki Cone Party for 10 Guests on a Budget
You’ve built your skills, from simple Temari to tackling rolls. Now it’s time for the ultimate payoff: sharing your new passion with friends. A DIY Temaki (hand roll) party is the most fun, interactive, and surprisingly budget-friendly way to host a sushi night. Temaki are cone-shaped rolls that guests assemble themselves, taking the pressure completely off the host to create dozens of perfect pieces. Your job is simply to prepare a beautiful spread of ingredients and let everyone become their own sushi chef.
The key to a successful and affordable party is smart ingredient planning. You don’t need expensive, sashimi-grade tuna for every guest. Instead, focus on a variety of textures and flavors. A foundation of homemade tamagoyaki (sweet Japanese omelet) and crunchy tempura sweet potato provides a substantial and inexpensive base. Add a creamy, savory element with a simple imitation crab salad. Freshness can come from crisp cucumber and creamy avocado batons. Then, you can choose just one “luxury” item to make the spread feel special, like a small jar of popping tobiko (flying fish roe). This mix ensures there’s something for everyone without breaking the bank.
Setting up your “Temaki Station” is also crucial for a smooth flow. According to advice from sushi instruction resource School of Sushi, arrange your bowls of fillings in a logical order on a large platter or board. Keep the nori sheets (cut in half) in an airtight container with a silica packet until the moment of service to ensure they stay crisp. A dedicated sauce bar with squeeze bottles of soy sauce, spicy mayo, and eel sauce makes it easy for guests to customize their cones. A Temaki party transforms dinner into a memorable, hands-on experience, making it the perfect, low-stress culmination of your sushi-making journey.
| Filling Type | Quantity Needed | Approximate Cost | Texture/Flavor Impact |
|---|---|---|---|
| Homemade Tamagoyaki | 6 eggs | $3-4 | Sweet, custardy, substantial |
| Tempura Sweet Potato | 2 large potatoes | $2-3 | Crunchy, sweet, filling |
| Imitation Crab Salad | 1 lb imitation crab | $6-8 | Creamy, savory, familiar |
| Cucumber & Avocado | 3 each | $5-6 | Fresh, crisp, creamy |
| One Luxury: Tobiko | 2 oz jar | $12-15 | Popping texture, umami burst |
By empowering your guests to create their own meal, you not only make your job as a host easier but also share the joy and creativity of sushi assembly in the most engaging way possible. Start planning your guest list!